‘People search websites’ are useful for finding nearly anyone’s personal information, but not so much if you do not want your personal information to be visible to everyone. These websites can share your personal data such as your addresses (past and present) and the names of your family members and known associates. This tutorial will walk you through the process of how to remove yourself from WhitePages listing, as well as from WhitePage Premium. This is significant because opting out of (free) WhitePages does not remove you from WhitePages Premium, a service that provides extensive personal data for a small fee. However, if you are unable to remove the listing on your own, consider opting for a reputation management service.
Please keep in mind that WhitePages’ website is constantly changing, so some of the steps in this tutorial may become obsolete by the time you try them.
What is WhitePages?
WhitePages is an online directory service that allows businesses to look up contact information, perform fraud screening, and identity verification. WhitePages.com has the most comprehensive database of contact information for Americans. Using the WhitePages database, you can easily find your contact information or look up people you know.
Here is some of the information that can be found in the WhitePages database.
- Home address (past and present)
- Cell and landline phone numbers
- email addresses
- Age and maiden names
- Financial records and property details
- Relatives
- Background checks
- Criminal records and traffic records
- Business details and professional licenses
- Scam fraud ratings
- Lien records
Anyone can unlock the full report and gain access to all of this information for a small fee. You can get far more detail and up-to-date reporting for an additional fee.
Most people understandably do not want this type of personal and private information to be easily accessible by anyone online. Fortunately for them, they can opt out of WhitePages. Opting out of WhitePages will remove your personal and private information from their database. This makes obtaining your private information much more difficult for identity thieves, online stalkers, and other malicious actors.
If you want to opt out of WhitePages on your own, this guide will walk you through each step and give you instructions on how to do so. However, if you do not have the time, do not want to deal with the hassle, or lack the technical skills required to complete the lengthy process, there are other options like a reputation management service.
How to Remove Yourself From WhitePages Listing
Remove Free Information
WhitePages gives away your name, address, phone number, and age for free to anyone without even verifying their identity. However, removing this information from WhitePages also does not cost anything and will prevent anyone from accessing this data.
To remove your legal history or your financial records from your profile, you will need to use the Premium method instead.
Here’s how you can remove free information from your WhitePages profile:
- Open WhitePages in your web browser. Ideally, you should open it in a desktop browser as some functions might not work properly in mobile devices.
- Type your name and zip code in the fields that appear on the home page. Click on the search button and a list of people who are located in the area with that name will appear. Alternatively, if you do not know the zip code, you can also enter the city or state name.
- Once you locate your name in the search results, click on the ‘View Details’ button. The listing will open after you click on this button.
If you cannot find the correct listing, try changing the city or zip code to nearby locations. Oftentimes, a listing might be incorrectly placed in other nearby areas.
- Now copy your listing’s address by clicking the URL on top of your browser window. Once you have clicked on the URL, it will get selected automatically, if it does not, select it and copy by pressing the keyboard shortcut or through the right click option.
Your WhitePages listing’s URL will ideally be like the following:
https://www.whitepages.com/name/Your-Name/Your-City/
- Once you have the URL copies, open the opt out page by clicking on the following link:
https://www.whitepages.com/suppression-requests
Do not copy this as it will remove the earlier copied link from the memory and you would have to copy it again.
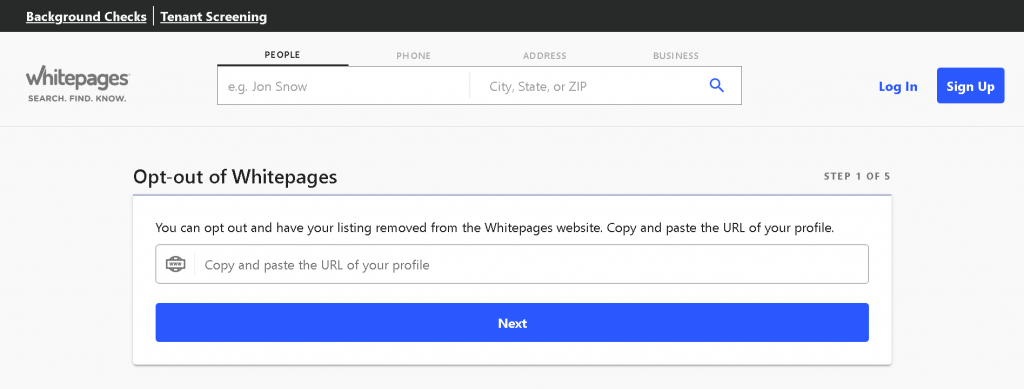
- After opening the opt out page, paste the link to your profile in the box that comes up on your screen and click on ‘Next’ button.
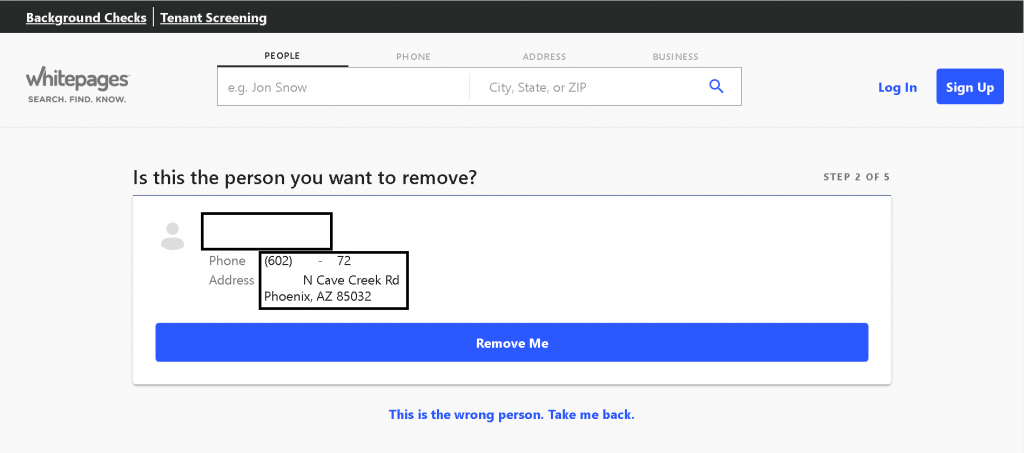
- Now, a page will appear on your screen with your profile information. It will display the following information
- Name
- Address
- Phone Number
You can cross verify the information and to make sure it is your profile and not anyone else’s. Once you have verified the information, click on the ‘Remove Me’ button.
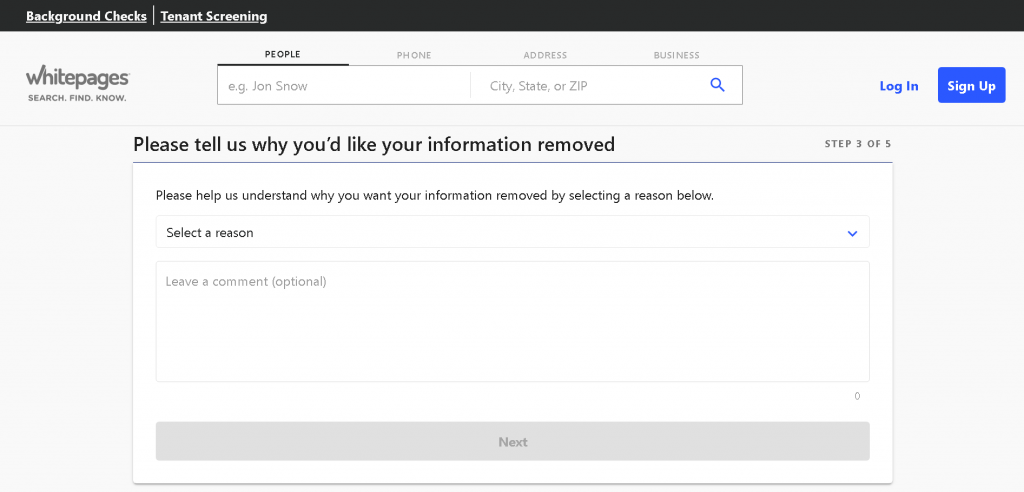
- On the next screen WhitePages will ask you to select a reason about why you would like to remove your information. Just select the most appropriate reason and leave a comment (if any) and press the ‘next’ button.
- After you have selected a reason for removal of your listing, it would then require you to verify your identity by entering your phone number and sharing a code that will be shared over a call.
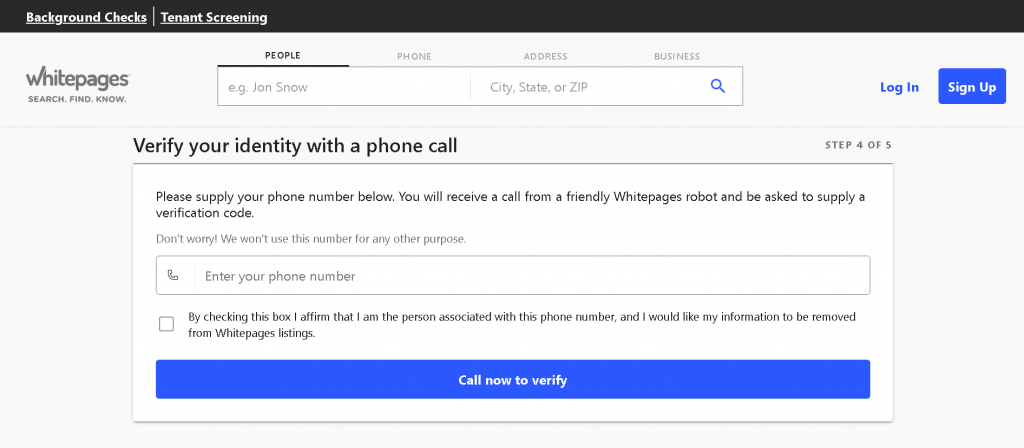
- Confirm the removal of your WhitePages listing. You should see a four-digit code on the verification code page. This code is required to complete the following steps:
- When your phone starts ringing, answer it.
- Listen to the automated voice on WhitePages.
- Enter the four-digit code displayed on the verification code page when prompted.
- Wait until the WhitePages call hangs up.
- Wait for 48 hours and check WhitePages again for your listing. While the majority of your free information should be removed immediately, it is possible that it will not be removed until 24 to 48 hours after you submit your request.
Unfortunately, search engines such as Google and Bing may continue to display snippets of your information for up to two weeks after you delete your WhitePages listing.
Remove Premium Information
- Determine which information is Premium.
Premium information includes things like background checks, legal records, and foreclosure/bankruptcy incidents, whereas free information only includes your name and address.
To view and remove Premium information about yourself, you must be a WhitePages Premium member, which costs at least $4.99 per month.
- Launch WhitePages
Before proceeding, if you aren’t logged into your Premium account, click Log in in the top-right corner of the page, enter your email address and password, and click Sign In.
If you are not already a WhitePages Premium member, click Sign up in the top-right corner of the page, then click SELECT PLAN below the $4.99/mo membership option, and then follow the on-screen instructions to set up your account.
To avoid paying more than $4.99, cancel after your information has been removed.
- Fill out the fields on the page with your name and zip code. When you click the search button, a list of people with that name who live in the area will appear.
If you do not know the zip code, you can enter the city or state name instead.
- Locate your premium data. Your Premium information should be displayed inside a light-blue box, with a blue ‘VIEW FULL REPORT’ button to the right of your name.
- If you do not see this information, go to the top of the page and click ‘Show More Premium Results’ to see if your information is not being displayed.
- You can try removing your middle name (if applicable) and/or changing the city or ZIP code to an older address, if you still cannot see your information.
- Make a note of the address for the Premium report. Right-click the blue ‘VIEW FULL REPORT’ button, then select Copy Link Address (or Copy Link Location on Firefox) from the drop-down menu that appears.
- Navigate to the Support Request page. In your computer’s web browser, open https://support.whitepages.com/hc/en-us/requests/new
- Choose a request. Then, in the resulting drop-down menu, select ‘I need to edit or remove a listing’ from the “Please choose your issue below” drop-down box.
- Complete the form. To complete your removal request, complete the following steps:
- In the “Your email address” text box, enter the email address associated with your Premium account.
- In the “Subject” text box, type a subject (for example, Listing Removal).
- In the “Description” text box, provide a brief explanation of why you want your listing removed.
- By right-clicking (or Ctrl-clicking) the text box and selecting Paste, you can paste the copied URL into the “Listing URL” text box.
- Click the Submit button. This blue button can be found at the bottom of the form. This will send your request to WhitePages. You should see a confirmation page and receive an email confirmation.
- Wait for 48 hours and check WhitePages again for your listing. While the majority of your free information should be removed immediately, it is possible that it will not be removed until 24 to 48 hours after you submit your request.
Unfortunately, search engines such as Google and Bing may continue to display snippets of your information for up to two weeks after you delete your WhitePages listing.
Also, Read
- How to Remove Google Reviews: 6 Steps for Removing Bad Reviews
- How to Drop a Pin in Google Maps – Desktop & Mobile
- Google Map Live Location: Everything you need to know
Conclusion
Most people understandably do not want their personal and private information to be so easily accessible online. Fortunately for them, they can opt out of WhitePages. The WhitePages opt out process deletes your records, making it much more difficult for stalkers, identity thieves, and other malicious individuals and entities to obtain your personal information. If you want to do it yourself, this free guide will show you exactly how to remove your listing from WhitePages.
Frequently Asked Questions
How does WhitePages get your information and address?
WhitePages data is collected from property deeds, telecom companies, and public records. Privacy is a common concern regarding Whitepages’ publishing of personal contact information.
How long does it take to get my information removed from WhitePages?
After submitting an opt-out request to WhitePages, you can expect a response from a member of WhitePages’ Customer Care Team within 48 business hours. It may take a few days for your information to be removed from WhitePages.
Furthermore, WhitePages does not store all of your information in databases that they do not control. Some third-party search engines may display WhitePages information that has been cached. It may take up to 30 days for search engine results pages to delete this cached data.
I have more than one listing on WhitePages. What should I do?
WhitePages works to consolidate their data into a single listing for each individual. They do, however, scrape data from massive public records databases made available by data brokers. As a result, duplicate records do occasionally appear on WhitePages. When one data broker provides contradictory information, a new profile is created.
If this occurs, the process outlined above must be repeated for each additional WhitePages profile. Also, before you have the information removed, make sure that the duplicate is truly a duplicate and not just a person who happens to have your name.


