In today’s era, the way we make decisions, both personally and in business, has evolved dramatically. Unlike the past century where instincts played a key role, we now rely on data. For small and medium-sized online store owners, accessing customer insights is simpler than ever, thanks to tools like Meta Pixel.
Are you eager to enhance your Facebook ads and boost your product sales? If your answer is a resounding “yes,” then you’re in the right place. Embark on a journey with us to discover how to add Facebook Pixel to Shopify store. By the end of this guide, you’ll be well-versed in leveraging the Facebook Pixel for your marketing needs.
What is Meta Pixel
The Facebook (Meta) Pixel is a small piece of code that tracks visitor activity on your website or online store. Its primary use is to measure the effectiveness of your ads, monitor website interactions, and target ads to the right audience. To implement the Facebook Pixel, it’s typically embedded in the header section of your website’s code, or you can use a partner integration tool for installation.
Once installed, the Pixel operates discreetly, collecting data and transmitting it to Facebook. This information is then available for analysis in the Facebook Ads Manager. Despite the changes brought about by iOS 14, the Facebook Pixel remains an indispensable tool for Facebook advertisers.
E-commerce web designers play a crucial role in enhancing Shopify websites by seamlessly integrating the Facebook Pixel. Their expertise ensures accurate tracking and optimized ad campaigns for improved business performance.
How Does the Facebook Pixel Function?
The Facebook Pixel is a compact piece of code that activates whenever someone visits your website or landing page. It tracks your website visitors and correlates them with Facebook/Instagram users. The Pixel monitors several types of data:
HTTP Headers: These include information such as IP addresses, webpage locations, browser details, and the documents accessed by the website user.
Pixel-specific Details: This includes the Pixel ID and the Facebook cookie data.
Button Click Data: Records which buttons are clicked on the site, the names of these buttons, and the pages accessed through these clicks.
Optional Values: You have the option to track additional information like conversion values, page types, etc., through custom events, which can include personal data.
Form Field Details: Collects data entered in forms, such as addresses, emails, and purchase quantities.
Advantages of Having Facebook Pixel on Shopify
Integrating Facebook Pixel with your Shopify store unlocks two significant capabilities. Firstly, the Pixel enables you to tailor ads based on specific interests and behaviors, offering insights into ad performance, budget utilization, and necessary adjustments for optimal ad settings.
Secondly, it facilitates engagement with visitors to your online store, helping you capture potential customers. Although setting up Facebook Pixel on Shopify can be challenging, it’s a crucial step for Shopify store owners. Let’s explore the benefits of this integration.
Better Ad Performance and Tracking
Facebook Pixel significantly boosts ad effectiveness by tracking user actions on your website post-ad-click. This granular data reveals which ads are driving desired outcomes and which ones require adjustments.
Investing in ads without tracking their impact on your profits can be futile. The insights gleaned from Meta Pixel not only enhance ad performance but also enable Facebook to identify potential buyers based on the data collected. Understanding user interactions with your ads allows for optimized targeting and ad refinement, leading to increased ROI and more efficient marketing strategies.
Helps Create Custom Targeted Audience
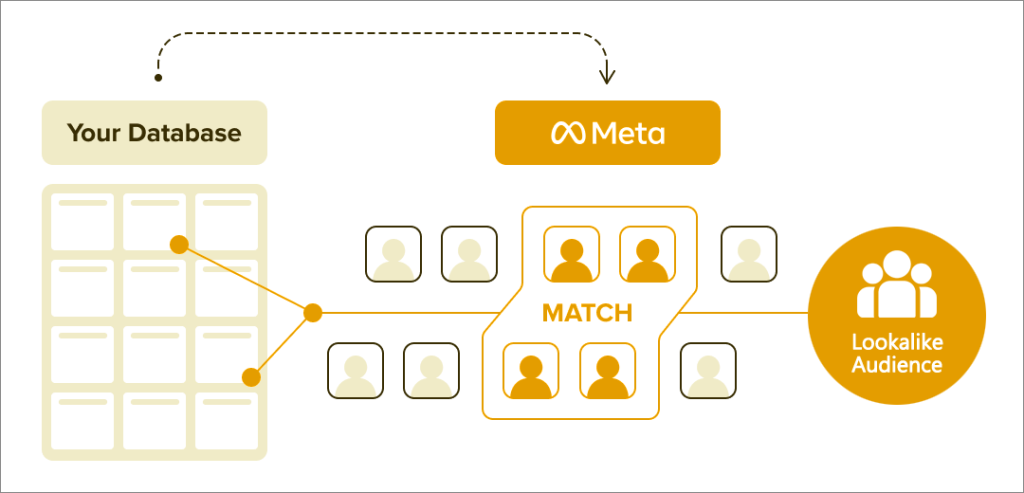
A key advantage of the Pixel is its ability to segment audiences based on their interest in your business. For example, you can create groups of recent website visitors or individuals who added items to their cart but didn’t complete the purchase.
These segments are invaluable for retargeting campaigns, enabling you to present tailored ads based on their previous interactions through Dynamic Product Ads. Furthermore, Facebook Pixel facilitates the creation of lookalike audiences. Suppose you have a customer base for a particular product. You can leverage this data to identify similar users on Facebook, expanding your reach to potential customers who mirror your existing clientele.
This strategy enhances the relevance of your ads, increasing engagement and persuasion levels among your target audience. By tailoring your audience segments, your ads resonate more effectively, potentially driving higher conversion rates.
Better Conversion Tracking
Facebook Pixel is instrumental for Shopify stores in monitoring the effectiveness of their ads by tracking user actions post-ad-click. For example, consider an ad for a specific product. Once a user clicks on this ad, the Facebook Pixel follows their subsequent actions on your Shopify site.
Actions like adding a product to the cart are recorded as ‘Add to Cart’ events, while purchases are tracked as ‘Purchase’ events. The Pixel also quantifies these conversions, including the monetary value of each purchase. This tracking enables you to gauge the sales generated by your ads and the revenue they produce.
This valuable data helps in identifying which ads are driving meaningful engagements and calculating the return on your ad spend. Understanding which ads and user interactions lead to purchases allows for the refinement of your advertising strategies to boost sales and profitability.
Also Read: Step by Step guide to Set Up GA4 eCommerce Tracking on Shopify
Helps Understand the Behavior of Customers
The Facebook Pixel offers insights into how visitors interact with your Shopify store after engaging with your Facebook ads. It can track specific actions, like when a user views a particular product or page on your site.
For instance, if numerous visitors are viewing a product but not purchasing it, it might indicate an issue with the product’s pricing or description. Understanding customer behavior on your site allows you to identify and address any problems or opportunities for improvement. Implementing these changes can enhance customer engagement and potentially increase conversions.
How to Add Facebook Pixel to Shopify
Understanding the significance and functionality of Facebook Pixel, let’s delve into the steps to create and set up Pixel on Shopify.
Step 1: Facebook Pixel Creation
Begin by creating your own Pixel on Facebook. Follow these steps:
Step 1: Visit the Events Manager section on Facebook.
Step 2: Click on “Connect Data Sources” in the menu on the left side.
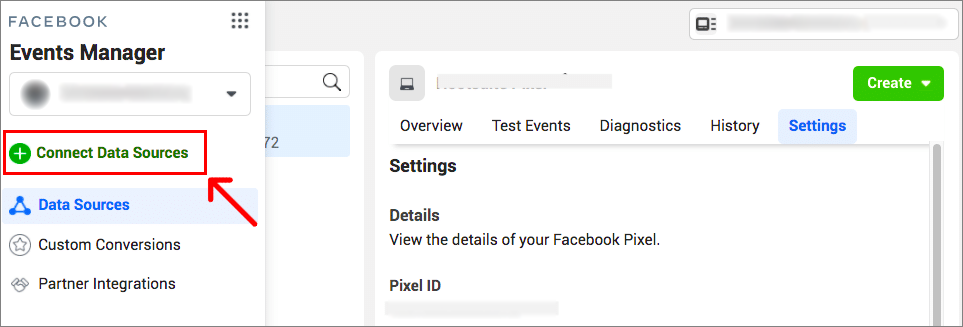
Step 3: Choose “Web” and tap on “Connect”.
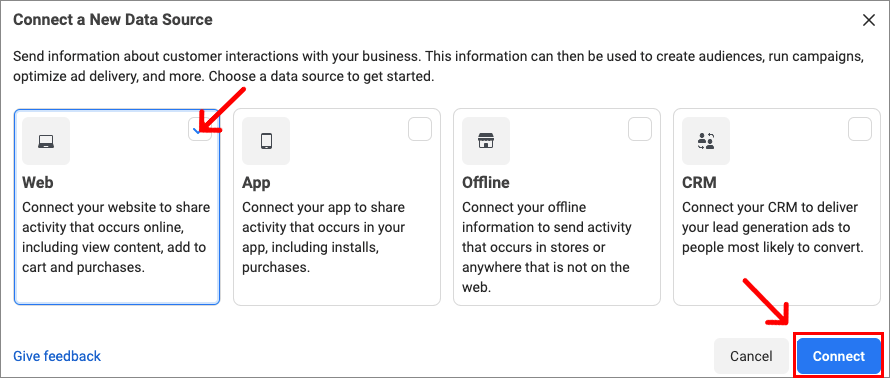
Step 4: Choose “Facebook Pixel” and then click “Connect” once more.
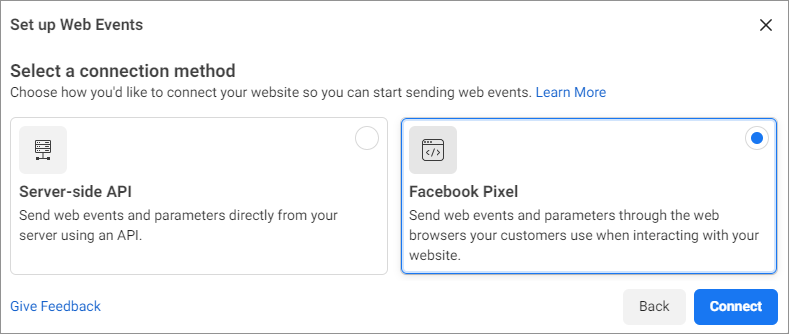
Step 5: After you understand how the Pixel works, click “Continue”.
Step 6: Name your Pixel something that shows what it is. Try using a more unique or imaginative name than “My Pixel”.
Step 7: Please type in your website URL to see how you can set it up easily.
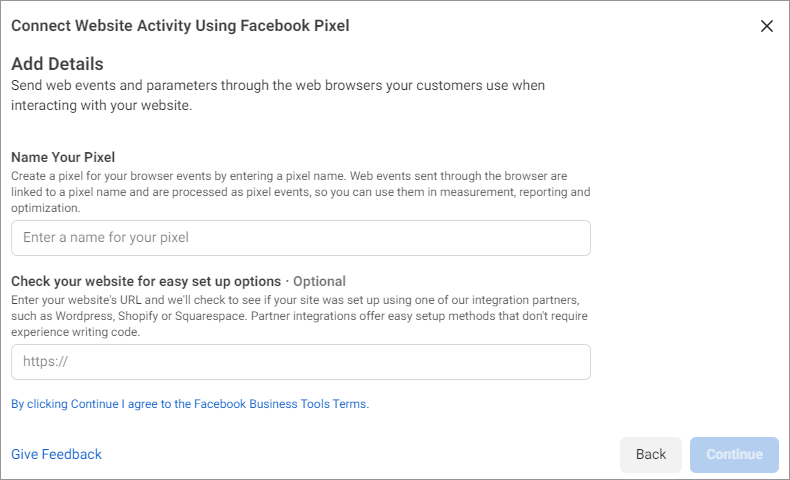
Step 8: Click on the button that says “Continue”.
Your Facebook Pixel is now created, but there’s more to do.
Step 2: Installing Facebook Pixel on Shopify
Next, integrate the newly created Pixel into your Shopify store.
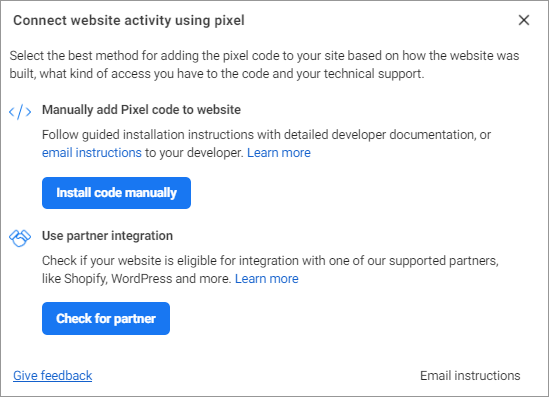
Linking Facebook Pixel With Your Shopify Store
Shopify’s integration with Facebook simplifies this process. In the Events Manager:
Step 1: Please log in to your Shopify.
Step 2: Go to “Settings” at the bottom left, then go to “Apps and Sales Channels”.
Step 3: Choose “Facebook & Instagram” from the App Store and then tap on “Add App”.
Step 4: Click the “Add Sales Channel” button to finish the setup.
Step 5: Click the “Start Setup” button.
Step 6: Please follow the directions on the screen to finish installing the program.
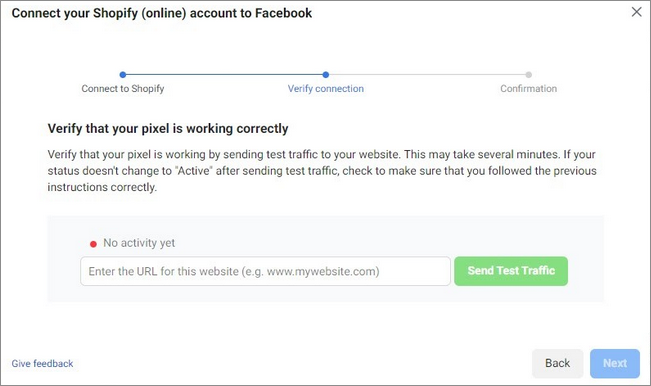
Once done, return to Facebook and check the box indicating you’ve completed the setup. Test the installation by entering your URL on the next page. A green dot and a confirmation message will appear once the activity is recorded, which may take up to 24 hours, but typically happens within 10 minutes. After confirming your installation, your setup is complete.
Step 3: Facebook Pixel and Shopify Event Management
With your Pixel now linked to Shopify, it’s time to focus on Pixel events. These events are specific actions visitors take on your website. Key events for online shopping include:
Add to Cart: This happens when someone puts a product into their shopping cart.
Add Payment Info: This happens when someone puts in their payment info while buying something online.
Start Checkout: This happens when someone clicks on the checkout button.
Buy: This happens when customers finish buying something and see the confirmation page.
Search: When people look for things in the store, this is called a search.
View Content: When a person goes to any page on your website, like a page with details about a product.
You can create custom conversions to track specific actions not listed above. The standard events are automatically integrated with your Shopify account when installing Pixel.
For events that don’t sync automatically, manual setup is required, but the Event Setup Tool simplifies this process.
Step 4: Set Up Events Using the Event Setup Tool to
Step 1: Visit Facebook Events Manager.
Step 2: Click on “Add Events” in the “Overview” tab.
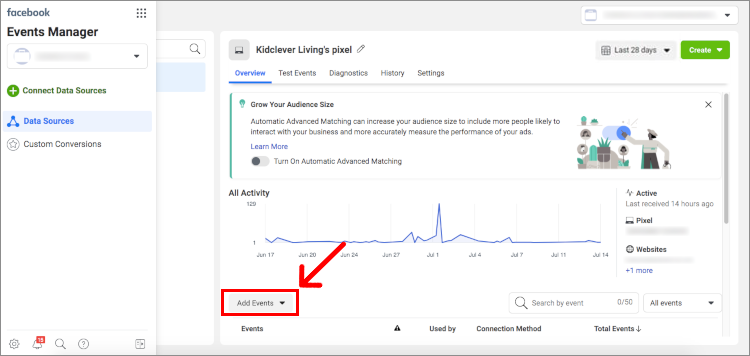
Step 3: Choose “From the Pixel” and then click on “Open Event Setup Tool”.
Step 4: Please put in your website’s URL and then click “Open Website”. Remember to include the full address with HTTP(s) at the start.
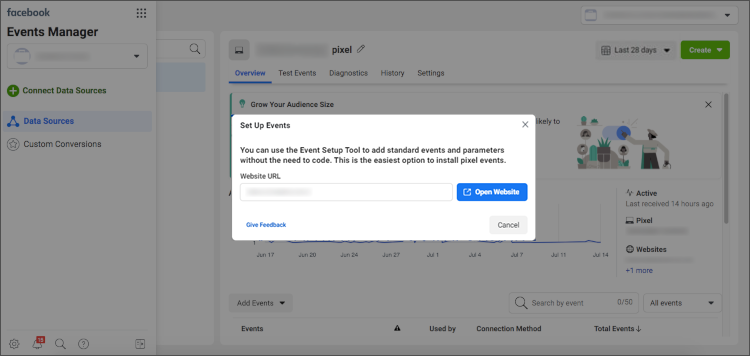
Step 5: The tool should now appear on your website. If that doesn’t work, attempt to disable your ad blocker.
Step 6: Now you can add a button or track URLs on every page of your website. You can see the information about your current events and change or remove them.
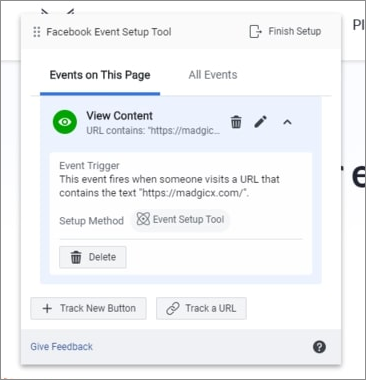
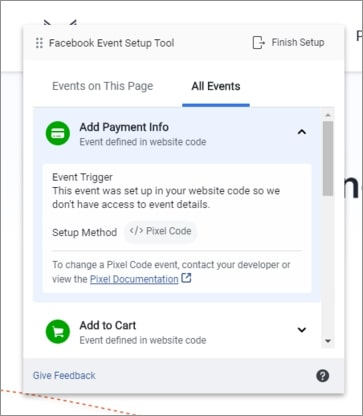
Step 7: You can also click on the “All Events” tab to see, make changes to, or remove events you created on other pages of your website.
Step 8: Please remember that if you create an event manually using your website’s code, you can’t see its information, make changes, or remove it using the Event Setup Tool.
Step 9: When you’re done, you can choose to click “Finish Setup” or go back and click “Disconnect” from the Events Manager.
Also Read: 13 eCommerce SEO Best Practices for Your Online Business
Keep Going Past the Pixel for Accurate Tracking
With the iOS 14 update, relying solely on Facebook Pixel for Shopify has become less viable for store owners. Many are turning to first-party tracking systems to provide accurate conversion data to the Pixel. However, setting these systems up can be complex.
To accurately track outcomes, consider implementing a Server-2-Server (S2S) setup with Enhanced Conversions. In this configuration, the Meta Pixel sends data to both Meta and your server. This approach aligns with Apple’s privacy guidelines and transfers comprehensive data from the server to Meta.
Additionally, this method offers improved sales optimization opportunities. By saving user information via cookies on your website, you can enrich your event data significantly. Setting up this system typically takes about 2 days, and it can yield at least 20% more data in your ad account.
Using Facebook Pixel on Shopify for Retargeting
As previously mentioned, a key advantage of Facebook Pixel is its capacity for targeted retargeting campaigns. Here’s a brief overview of how to execute this:
Step 1: Create Custom Audiences
It’s a reality that not all first-time visitors to your website will convert to customers. While this can’t be entirely changed, retargeting offers a strategic approach to encourage return visits.
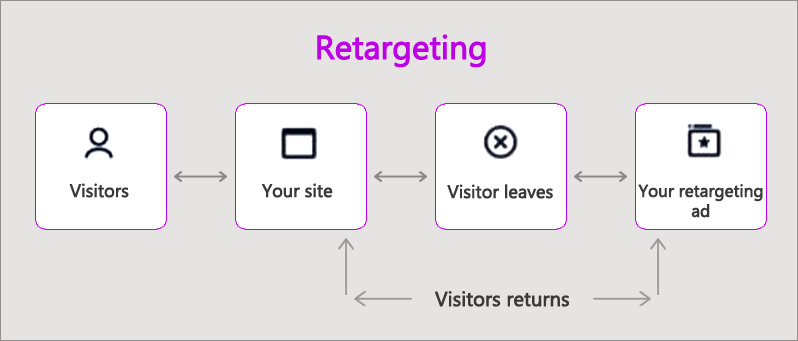
Retargeting leverages the Pixel to track previous website visitors, enabling you to present them with new ads aimed at drawing them back. For example, create a group of people who visited your site but didn’t make a purchase. Keep in mind that there are approximately 13 different types of custom audiences and even more retargeting strategies. Experiment with various tactics to find the most effective approach for your audience.
Step 2: Use Dynamic Product Ads
Ever browsed products online, then later seen ads for those exact items on Facebook? That’s Dynamic Product Ads at work.
These ads utilize data from your website and product catalog to retarget people with the products they showed interest in. This can happen across various platforms, including your website, app, or other sales channels.
Setting up Dynamic Product Ads might require more effort compared to using the Pixel alone, but the potential benefits are substantial. For instance, Target, a major retailer in the United States, reportedly doubled its sales through these ads.
Step 3: Follow Best Practices for Retargeting
To ensure the effectiveness of your retargeting ads, consider these key practices:
Segmentation: Differentiate your visitors. Some might have briefly visited your homepage, while others are closer to making a purchase. Tailor your ads accordingly. For example, retarget individuals who viewed a product but didn’t buy with ads featuring that same product. This could be the nudge they need to complete the purchase.
Exclusion: Strategically excluding certain audiences is as crucial as targeting them. This ensures your ads reach the right people at the right times.
Extras: Offering incentives, such as discounts or free shipping, can be compelling. It’s akin to saying, “We noticed you didn’t complete your purchase. How about a small discount as an encouragement?” This approach can effectively convert someone on the verge of buying into a confirmed customer.
Remember to continually test and optimize your ads based on their performance.
Fixing Issues With Facebook Pixel on Shopify
It’s wise to be optimistic yet prepared for challenges with Facebook Pixel. If you’re experiencing a decline in conversions from your ads, it’s crucial to first verify that your Pixel is correctly set up.
Utilize various conversion tracking methods to capture comprehensive data. Facebook’s Facebook Pixel Helper is a browser tool designed to assist in this process. It helps identify the Pixels on your website and alerts you to any setup issues.
Steps to Add Facebook Pixel Helper Extension to Chrome
Step 1: Click on this link to install the Facebook Pixel Helper extension on your Chrome browser.

Step 2: Visit your website.
Step 3: If your Pixel is working, the Facebook Pixel extension icon will change to blue and show the number of Meta Pixels that are being used on the website.
Step 4: Make sure the Pixel on your website has the same ID as the one in the Events Manager.
Step 5: When you click on the Facebook Pixel icon, a small window will open to show if your Pixel is working. If not, you will see an error message.
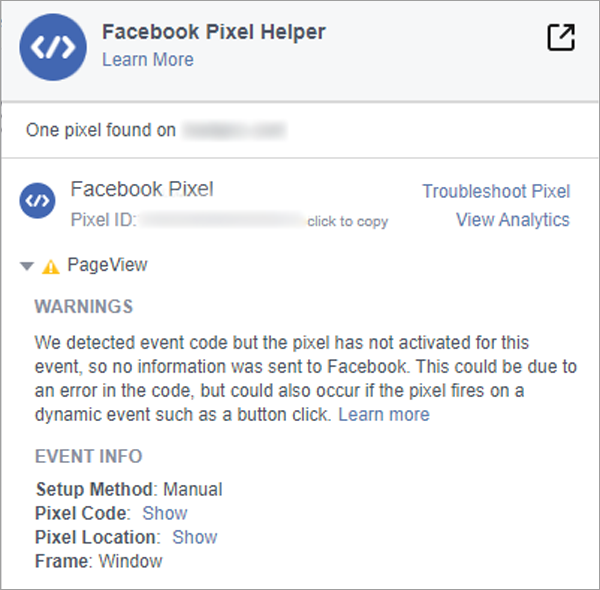
Step 6: If you find any problems, you can look at Facebook’s troubleshooting guide to learn how to solve them.
Steps to Delete Facebook Pixel from Shopify Store
If you need to replace your Pixel or wish to stop using Facebook tracking on your Shopify store, follow these steps:
Step 1: Proceed to your Shopify admin.
Step 2: Click on “Online store” in the menu, then go to “Preferences”.
Step 3: You will see a window on the right side. Look for Facebook Pixel, and then click on “Change”.
Step 4: If you want to get rid of it, press “Delete” and then press “Save”.
Wrapping Up
The Facebook Pixel is more than just a code; it’s an essential tool for tracking internet user behavior and delivering personalized ads. It’s particularly beneficial for Shopify store owners, enhancing their ability to boost sales. While integrating Pixel into Shopify might seem daunting initially, following the provided instructions will simplify the process.
Whether you’re new to Shopify or already achieving sales, the Pixel offers valuable insights into customer behavior, helping convert potential transactions into actual revenue. It acts like a digital detective, aiding your marketing efforts. Once you experience the capabilities of the Facebook Pixel, you’ll appreciate its indispensable role in your advertising strategy. Here’s to crafting better ads and increasing sales in 2024.
FAQs
Why does my Facebook Pixel display the color red?
A red indicator typically means your Facebook Pixel is not correctly linked to your store. Check for any issues in your Events Manager and consult this Facebook help page for potential problems and solutions.
How do I find Facebook Pixel in Business Manager?
In Business Manager, navigate to “Settings”, click on “Data Sources”, and then select “Pixels” to find your Facebook Pixel.
How to increase the number of Facebook Pixels on a Shopify store?
Currently, it’s advised to have only one Facebook Pixel per verified store website on Facebook. The events selected for this Pixel should suffice for tracking and ad setup. If you manage multiple Shopify stores, you can maintain and oversee all Pixels for these stores in a single Facebook Business Manager.
Where can I find Facebook Pixel on Shopify?
To locate the linked Facebook Pixel on Shopify, go to your Shopify Admin Page. Under “Sales Channels”, select “Facebook”. Then proceed to “Settings” and choose “Data sharing settings”. The connected Pixel will be displayed at the end of this page.


