Facebook pixel gives you the information you need to effectively and successfully target users who visit your site and engage with your content. You can use the Facebook Pixel Helper to monitor your pixels to ensure they are working properly. If you know how to utilize Pixel Helper, it can be a handy tool. In this post, we will go over everything you need to know about this nifty tool, including what it is, how to use it, and how to troubleshoot any issues that may emerge.
But before we get into the meat of the matter, let’s define the topic first. Facebook Pixel is a piece of code that you place on your website. It captures information that allows you to track your Facebook ad conversions. It also helps advertisers track how effective their ads are and then optimize them to ensure that the proper individuals see them. Based on how visitors to a website behave, Facebook Pixel assists businesses in determining the ideal advertising plan. But this was only a brief introduction to this super-useful tool. Read on to know more about it and how you can use it to do better marketing.
What is Facebook Pixel Helper?
The Facebook Pixel Helper is a Chrome addon that guarantees the Pixel is correctly installed on your website pages. It displays the number of Pixels on the page, as well as any faults, warnings, or installation concerns. It is a must-have tool for any Facebook marketer, whether they are new to marketing or seasoned players.
Facebook Pixel Helper is currently used by over a million users. Small business owners who are not particularly tech-savvy will benefit from the extension. It is a simple application that ensures your pixel is correctly embedded in your website. Use it to ensure that the pixel is compatible with your Facebook advertising.
How to Install Facebook Pixel Helper?
Installing Facebook Pixel Helper in your browser is easy. Just follow these simple steps to get started:
- Download & Install Google Chrome Browser
- Open Chrome Web Store
- Search For Facebook Pixel Helper
- Install Facebook Pixel Helper
- Use Facebook Pixel Helper
Let’s discuss these steps to help you with the installation process.
Download & Install Google Chrome Browser
Facebook Pixel Helper extension works only with the Google Chrome browser. If you are not using it already, then download Google Chrome and install it on your computer system to get started. This browser by Google comes with several benefits, so you do not have to worry about making the big browser change. However, if you are already using the chrome browser, make sure that it is the latest version.
Open Chrome Web Store
After you have installed the chrome browser, look for Chrome Web Store. You can find it by going into the menu at the top right corner of the browser. Select ‘More Tools’ and then click on the ‘Extensions’ tab. Once the extensions page opens, click on the menu at the top left corner of the page. Go to the bottom of the menu to find the Chrome Web Store. Click on this, and the extension store page will open for you.
Search For Facebook Pixel Helper
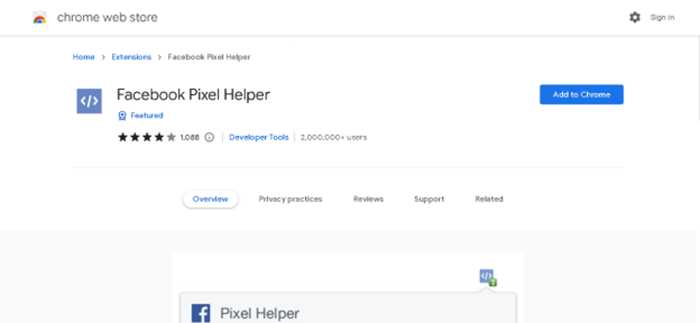
Once you are into the Chrome Web Store, look for Facebook Pixel Helper by searching for it through the toolbar. The search will show several results. Make sure you select the right extension. After opening the extension page, click on the ‘Add to Chrome’ button to get started with this tool.
Install Facebook Pixel Helper
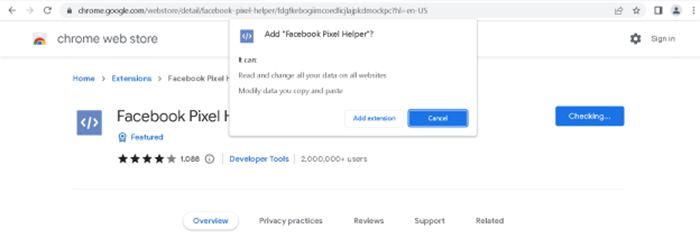
Now that you have reached the Facebook Pixel Helper page on Chrome Web Store, click on the ‘Add to Chrome’ button to install the extension to your browser. You will see a pop-up asking for some permissions and telling you what data the extension will have access to. Accept it by clicking on the ‘Add Extension’ button. You now have the extension ready in your browser.
Use Facebook Pixel Helper
Now you will be able to see a gray icon in the extension menu of your browser. The icon will have a symbol with ‘</>’ on it. Its color will change from gray to blue whenever you visit a website that uses Facebook Pixel.
Facebook Pixel Helper Icon
How to Use Facebook Pixel Helper?
After you have completed the FB Pixel Helper setup, you can start looking for Facebook pixel issues on your website. It is vital to remember that errors do not always indicate a problem with your pixel.
Although the pixel may appear to be working fine, you must adjust the settings on your Facebook account for the pixel to track the correct data. It will help the extension detect mistakes and identify the pixel’s events. Facebook Pixel Helper will also provide you tips on how to make your pixel more efficient, such as:
Keeping Track of What Happens on Your Website: To track the actions you are interested in, paste your Facebook pixel base code into your website header. If your pixel is too far down on your page, it may miss some user activities if they happen before your pixel fires.
Create a Conversion Event for Each page: Except when additional conversion events trigger on the page when a user makes an action, Facebook suggests inserting no more than one conversion event per page. This will aid in the tracking and optimization of events.
Opt-in for Better Tracking: If you see an error message that says ‘pixel code on the page did not load’, that means you have turned off Facebook monitoring. Hence, Facebook might not be able to tell if your pixel is malfunctioning. To opt back in, go to your Facebook settings page.
Also, Read
- Utilizing the Facebook Ads Library to Research Competition
- What is the Best Time to Post on Facebook
- How to Use Sponsored Twitter Ads to Grow your Business?
Common Errors Facebook Pixel Helper Can Detect
Facebook Pixel Helper is a great tool when it comes to finding errors with your pixel installation. While it is straightforward to identify the issues, it might not be an easy task to correct them. Another difficulty that you might encounter while trying to run effective Facebook ads is the lack of keywords. You can use Facebook Ads Library to research competition and find relevant keywords.
Here are some common pixel issues that the it can detect for you:
No Pixel Found
The error ‘no pixel found’ is a common one. This error indicates that the Facebook Pixel Helper could not locate any coding for the extension in your website header. To resolve this issue, you must examine your website’s coding. Check to see if the coding is incorporated into your website. Double-check the Pixel ID using your Facebook account if that’s the case.
Pixel Did Not Load
Your pixel could not load is another common problem. The pixel helper discovered an indication of a Facebook pixel code when this error occurred, but the HTTP call was never made. If you receive this error, your website’s pixel code may be incorrect. However, it is possible that you have not completed the requested activity yet. If your event requires you to click a button, you may need to click it to fix the problem. If you have trouble finishing the event, double-check that you have entered the Pixel ID correctly.
Not a Standard Event
You select an event to monitor when you set up a pixel. This could be as simple as pressing a button or watching a video. You may receive the ‘not a standard event’ error when you set a custom event for conversion tracking. This problem is usually caused by your Facebook configuration rather than the pixel itself. You should investigate your event to see if there is a reason for this problem. You may need to reschedule your event so that Facebook can track it.
Invalid Pixel ID
When you track Facebook advertising, you will want to collect data from your audience to provide them with more relevant ads later. You won’t be able to track information if your pixel ID is invalid. Double-check your ID number if you see this issue while using the Facebook Pixel Helper. Check your Pixel ID in your Facebook account and compare it to the code on your website. It is possible that the entire pixel code did not get copied into your site’s coding due to a copy and paste issue.
Duplicate Pixels Identified
When you look at your website, you can see an error message that states ‘duplicate pixels identified.’ This issue indicates that there are many pixels on a single page. These pixels are not multiples of the same pixel but rather a collection of pixels on the same page. You may need to modify your Facebook pixel positioning if you get this issue. It is recommended that you install only one Facebook pixel for a page. This configuration ensures that the data you need for your advertising campaign is precise.
Pixel Took Too Long to Load
Another common blunder is when the pixel takes too long to load. If you get this problem, you will have to re-enter the code in your site’s header. It is possible that you may have pasted the code after the ‘</head>’ tag in the HTML. According to Facebook, you must place the code as early as possible on the web page.
Pixel Activated Multiple Times
This error indicates that a pixel was sent to Facebook multiple times. It has the same ID and event name as the previous one. Only when your page loads should a pixel be activated. You may have the same pixel code listed more than once if you get an error stating the pixel is activated several times. Check your coding to ensure the pixel ID is only used once on your website.
Conclusion
If you want to use the Facebook pixel on your site, you must ensure it is working. With the Facebook Pixel Helper, you can quickly identify and correct pixel issues. It is a quick method to make sure you are getting the most out of your Facebook pixel.
It takes time and effort to use, set up, and track your Facebook pixel. So, if you do not have any experience running ads, it might be a better choice to hire an expert agency instead. You can opt for Paid Advertising Services(PPC) from a reputed agency. It will help you fully utilize the campaign budget and give the best return on investment.
Frequently Asked Questions
What does Facebook pixel helper do?
Facebook Pixel Helper is a troubleshooting tool for determining whether or not your Facebook Pixel is functioning properly. You may verify if a Facebook Pixel is installed on a website, check for issues, and understand the events that your Facebook Pixel is receiving after installing the Chrome plugin.
How do I get a Facebook pixel helper?
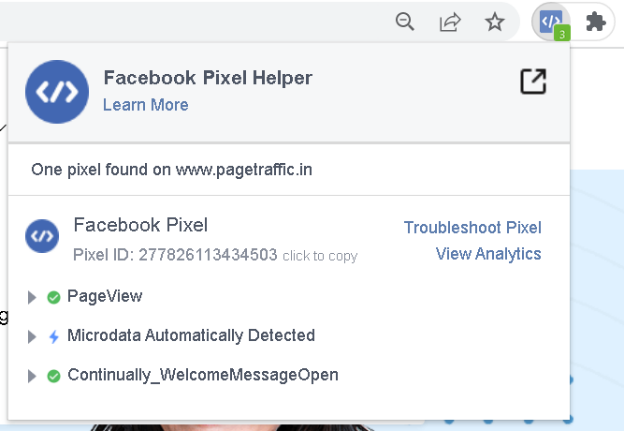
A small icon will appear next to your address bar once you have set up the Facebook Pixel Helper. Go to your website and click the Pixel Helper icon in your Chrome browser. The pop-up will display which pixels and events were discovered on the page and whether they loaded successfully.
Is Facebook pixel helper free download?
The Facebook Pixel Assistant is a free Google Chrome Extension available through the Chrome Web Store. It is generally used as a debugging tool to ensure that Facebook Pixel has been properly integrated into your website.
How do I know if the Facebook pixel is installed?
Go to your website and load a page to see if the pixel is working. Return to Ads Manager’s ‘Pixels’ tab, where a green dot should appear next to information in the upper right corner, indicating when the pixel was last active. To be sure, you can utilize the Facebook Pixel Helper Chrome browser extension. Its icon will turn blue whenever a website with an active Pixel loads in the browser window.
